The performance of an e-commerce store is no longer just a luxury; it is a critical component of search engine optimization. For Magento 2 merchants, image management is often the biggest hurdle to achieving high scores in Google PageSpeed Insights.
Image lazy loading is a technical solution that addresses this bottleneck. By delaying the loading of non-critical images until they are required, Magento stores can significantly reduce initial load times.
This guide explores the factual benefits of lazy loading, the various implementation methods available in Magento 2, and how to maintain SEO integrity while optimizing performance.
Nội dung bài viết
What is image lazy loading in Magento 2?
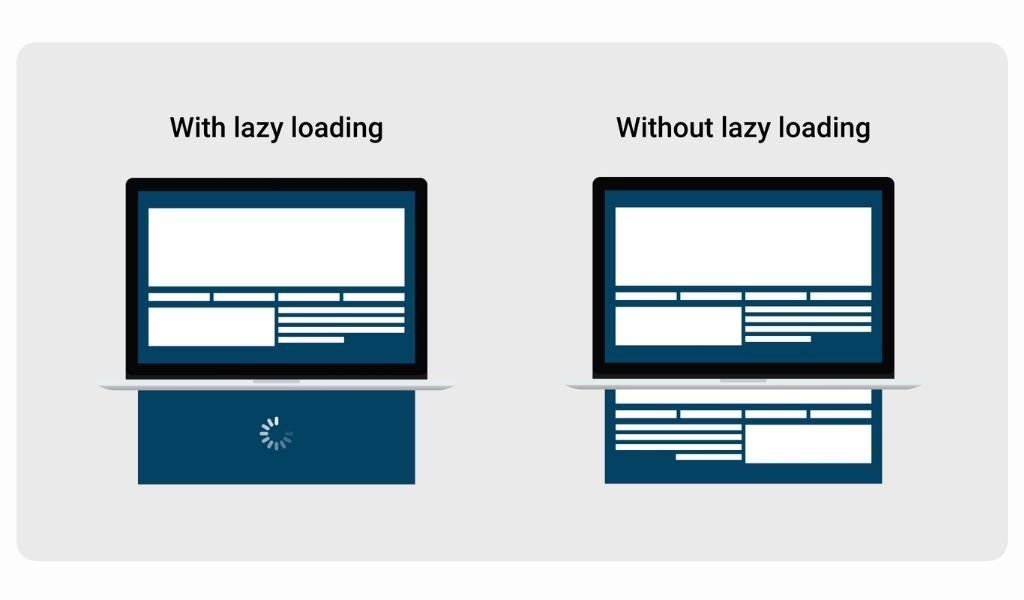
Image lazy loading is a performance technique that instructs the browser to delay the fetching of image resources until they are about to enter the user’s viewport. In a standard Magento environment without lazy loading, when a user clicks on a category page containing 20 or 30 products, the browser attempts to download all 30 images at once. This consumes significant bandwidth and processing power before the user even sees the top of the page.
With lazy loading active, the browser prioritized only the images visible on the screen. As the user scrolls down the page, the system fetches the subsequent images just in time. Magento 2 supports this technique through several avenues.
Since version 2.4, Magento has integrated native browser-level lazy loading support. However, many merchants still utilize custom JavaScript implementations or a Magento 2 SEO extension to gain more granular control over which elements are deferred.
SEO benefits of image lazy loading for Magento 2 stores
Implementing lazy loading is a direct investment in your store’s search visibility. Google has explicitly stated that page experience is a ranking factor, and lazy loading directly influences the metrics that Google uses to measure this experience.
Improve page speed and core web vitals
The most immediate impact of lazy loading is the improvement of Core Web Vitals. These are a set of specific factors that Google considers important in a webpage’s overall user experience.
- Largest contentful paint (LCP): This measures how long it takes for the largest content element on the screen to become visible. By deferring off-screen images, the browser can dedicate all its resources to loading the LCP element (often a hero banner or product image) much faster.
- First contentful paint (FCP): This tracks the time from when the page starts loading to when any part of the page’s content is rendered on the screen. Reducing the initial image payload helps the FCP occur earlier.
- Total blocking time (TBT): When a browser is busy downloading 50 images at once, the main thread can become blocked, making the page unresponsive to user inputs like clicks or scrolls. Lazy loading keeps the main thread clear.
Reduce bounce rate
Technical SEO is not just about crawlers; it is about keeping users on the site. A slow-loading category page is one of the leading causes of high bounce rates in e-commerce.
By providing a “snappy” feel where the top of the page is ready instantly, you satisfy user intent quickly. Improved behavioral signals, such as lower bounce rates and longer time-on-site, are viewed positively by search algorithms.
To further enhance this, ensuring proper Magento SEO image alt tags are present during the loading process helps search engines understand the context of the deferred content even before it is fully rendered.
Optimize mobile performance
Mobile-first indexing is the standard for Google. Mobile users often browse on 4G or 5G connections that may have higher latency or data caps.
In these scenarios, loading 5MB of images for a page where the user only views the top half is inefficient and detrimental to SEO.
Lazy loading ensures that mobile users only download what they actually consume, preserving their data and ensuring the site remains functional even on slower mobile networks.
Comprehensive Magento image optimization for better SEO must include lazy loading to be considered truly mobile-friendly.
4 Methods to implement image lazy loading in Magento 2
There are four primary ways to handle this configuration, ranging from native browser features to highly customized theme-level logic.
Method 1: Native browser lazy loading (loading=”lazy”)
This is the most modern and efficient approach. It relies on the browser’s built-in ability to manage image priorities without requiring external JavaScript libraries.
Step-by-step in Magento store
- Step 1: Check Magento version. Ensure your store is running Magento 2.4.x or later. This version introduced the native support for the loading=”lazy” attribute in the core code.
- Step 2: Verify lazy loading in HTML. Navigate to a product or category page on your frontend. Right-click an image that is further down the page and select “Inspect.” Look for the loading=”lazy” attribute within the <img> tag.
- Step 3: Exclude above-the-fold images. It is critical for SEO that images in the initial viewport (like hero banners) are not lazy-loaded. For these images, you should explicitly set loading=”eager”. This can be done by modifying the specific .phtml templates or layout XML files associated with your header or top banners.
Best for
- Default Magento 2.4+ installations.
- Stores prioritizing a “lightweight” codebase with minimal JavaScript.
- SEO-focused websites that want to follow Google’s recommended standards for native attribute usage.
Method 2: JavaScript-based lazy loading (Intersection Observer)
Before native browser support was widespread, developers used JavaScript to detect when an image was about to enter the viewport. This is still useful for complex designs or background images.
Step-by-step in Magento store
- Step 1: Disable native lazy loading. If you choose this route, you may need to remove the loading=”lazy” attribute from your theme to prevent conflicts between the browser and your script.
- Step 2: Modify image markup. Change the standard src attribute to data-src. This prevents the browser from loading the image immediately. The markup should look like: <img data-src=”product.jpg” class=”lazyload” alt=”Product Name”>.
- Step 3: Add JavaScript logic. Use the Intersection Observer API. This script watches the scroll position and, as a “lazyload” class element approaches the viewport, it swaps the data-src value into the actual src attribute, triggering the download.
Best for
- Custom themes that use background images in CSS (which native lazy loading doesn’t handle well).
- Design-focused stores that want “blur-up” or “fade-in” transition effects as images load.
Method 3: Extension-based lazy loading
For store owners who are not comfortable editing PHP or XML files, using a dedicated extension is the most reliable way to ensure full site coverage.
Step-by-step in Magento store
- Step 1: Install the extension. It is recommended to use a reputable provider such as the BSS Commerce Lazy Loading extension. Install the module via Composer: composer require bsscommerce/lazy-loading.
- Step 2: Enable the module. Run the standard Magento deployment commands:
- php bin/magento module:enable Bss_LazyLoading
- php bin/magento setup:upgrade
- php bin/magento setup:static-content:deploy
- Step 3: Configure in Admin. Navigate to Stores > Configuration > BSS Commerce > Lazy Loading. Here, you can toggle the feature and, most importantly, define “Exclude” rules. You must add the CSS classes or IDs of your hero banners and PDP main images to the exclusion list to ensure they load “eagerly” for LCP optimization.
- Step 4: Review HTML output. Ensure the extension is injecting the attributes correctly without breaking the <img> tag structure.
Best for
- Merchants looking for a “plug-and-play” solution.
- Non-technical administrators.
- Large stores with complex image galleries that need central management.
Method 4: Theme-level custom lazy loading
This method involves a developer manually auditing every template file in a custom theme to apply the most efficient loading logic per element.
Step-by-step in Magento store
- Step 1: Identify image usage. Audit the Product Listing Pages (PLP), Product Detail Pages (PDP), and CMS blocks.
- Step 2: Update theme templates. In your custom theme’s .phtml files, ensure images are generated with the proper attributes and escape logic: <img src=”image.jpg” loading=”lazy” alt=”<?= $block->escapeHtml($product->getName()) ?>”>.
- Step 3: Apply conditional logic. Add logic to check if the image is the “first” in a loop. If it is the first product image on a mobile view, it should be eager; subsequent images should be lazy.
- Step 4: Handle background images. Use a small JavaScript snippet specifically for CMS blocks where images are defined in CSS.
- Step 5: Verify overrides. Ensure that your changes in app/design/frontend/Vendor/theme are correctly overriding the Magento core or parent theme files.
Best for
- High-performance, custom-built Magento themes.
- Developers who want absolute control over the Document Object Model (DOM).
Post-configuration: SEO and performance checks
Once lazy loading is implemented, you must verify that it has not negatively impacted your SEO.
- Confirm image URLs in HTML: View the page source (Ctrl+U). Even if the image hasn’t loaded yet, the URL should be present in a data-src or src attribute so that search engine crawlers can still find the image link.
- Meaningful alt attributes: Ensure every lazy-loaded image still has a descriptive alt tag. Search engines use this text to index the image before the file is even fetched.
- Verify above-the-fold status: Use a tool like PageSpeed Insights to ensure that your “Largest Contentful Paint” element is not being lazy-loaded. If it is, you will see a warning about “LCP element was lazily loaded.”
- Monitor Core Web Vitals: Check your Google Search Console under the “Core Web Vitals” report to see if the “Lab Data” translates into “Field Data” improvements over the next 28 days.
- Indexing Check: Use the “Inspect URL” tool in Google Search Console on a few product pages to ensure that Googlebot is seeing the images correctly in the rendered HTML.
When lazy loading may not be ideal for Magento SEO
While generally beneficial, lazy loading is not a “set it and forget it” solution for every scenario.
- Image-heavy landing pages: If you have a specific landing page designed as a high-end visual lookbook or gallery, users expect to see the images immediately. Implementing aggressive lazy loading here can lead to a “stuttering” experience that feels unpolished.
- Pages targeting image search traffic: If a significant portion of your traffic comes from Google Image Search (e.g., for infographics, diagrams, or high-detail textures), you may want to load those specific images eagerly to ensure they are prioritized for indexing.
- High-speed desktop audiences: If your analytics show that 95% of your users are on high-speed corporate fiber connections using desktop computers, the performance gains of lazy loading are minimal compared to the risk of layout shift (CLS). In these rare cases, standard loading with optimized WebP images might be sufficient.
Conclusion
Configuring image lazy loading in Magento 2 is a foundational step in modern e-commerce SEO. Whether you choose the native browser method for its simplicity, a JavaScript approach for its flexibility, or an extension for its ease of use, the goal remains the same: prioritizing the user’s immediate needs while deferring non-essential data. By following the steps outlined in this guide and carefully excluding above-the-fold content, you can ensure your Magento store remains fast, user-friendly, and highly competitive in search engine rankings.