Implementing an effective Magento 2 URLs redirects strategy is essential for maintaining SEO value and ensuring a seamless user experience during URL changes. In Magento 2, redirects help manage outdated product links, category restructuring, domain migrations, and overall site optimization. By using built-in URL Rewrite tools, server-level rules, or advanced extensions, store owners can control traffic flow, prevent 404 errors, and preserve search rankings while keeping navigation smooth and consistent for customers.
Nội dung bài viết
What is a Magento Redirect?
A Magento redirect is a method of forwarding one URL to another within your Magento 2 store. Redirects help maintain a smooth user experience, preserve SEO value, and prevent broken links when URLs change. T
Redirects are often necessary because URLs change, but many redirect issues can be avoided by planning a clean, consistent URL structure from the beginning. Using readable, SEO-friendly URLs reduces duplicate paths, minimizes unnecessary redirects, and helps search engines understand page relevance more clearly over time.
Types of Redirects in Magento:
1. 301 Redirect (Permanent)
- Tells browsers and search engines that the original URL has permanently moved to a new location.
- Preserves most of the original page’s SEO value.
- Ideal for product URL changes, category updates, or site migrations.
2. 302 Redirect (Temporary)
- Indicates a temporary change in URL.
- Search engines may continue to index the old URL.
- Best for limited-time promotions or seasonal pages.
3. 307 Redirect (Temporary – HTTP/1.1 Standard)
-
- Similar to 302 but explicitly preserves the request method (GET or POST).
- Useful for forms or checkout pages where preserving request data is important.
- Similar to 302 but explicitly preserves the request method (GET or POST).
How to Create Redirects in Magento 2 (Step‑By‑Step)
Magento 2 supports multiple ways to create redirects depending on your level of technical expertise and the volume or complexity of redirects you need. You can use the Admin Panel for simple redirects, modify server configuration files, or even implement redirects programmatically for advanced use cases. Each method works, but choosing the right one depends on your store’s needs and your comfort level with technical tasks.
Using the Magento Admin Panel
The URL Rewrites interface in the Magento 2 Admin Panel is the easiest and most intuitive way to create redirects. It’s ideal for managing individual redirects — such as when renaming a product URL or redirecting an outdated blog page — without any coding.
Step‑by‑Step:
1. Log in to the Admin Dashboard.
2. Navigate to Marketing → SEO & Search → URL Rewrites.
3. Click Add URL Rewrite.
4. Choose the redirect type from the dropdown:
- Product Redirect: ideal for a specific product page that’s moved or deleted.
- Category Redirect: good when reorganizing category structures.
- Custom Redirect: flexible option for any other URL change.
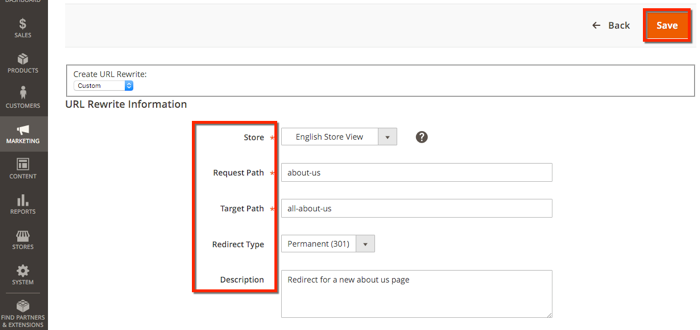
5. Fill in the redirect details:
-
- Request Path: enter the old URL (relative path, without the domain).
- Target Path: enter the new URL where visitors should be directed.
- Redirect Type: choose 301 (permanent) when the URL change is permanent, or 302 (temporary) for short‑term changes.
- Request Path: enter the old URL (relative path, without the domain).
6. Save the redirect rule.
7. Test the redirect by opening the old URL in a browser to confirm it forwards correctly.
Tips for Admin Panel Redirects:
- Always use 301 redirects for permanent moves to preserve SEO value.
- Keep consistent URL case and avoid trailing slashes where possible to prevent duplicate entries.
- Test redirects in both incognito and regular browser sessions to ensure caches aren’t masking issues.
Using the .htaccess File (Apache)
If your server uses Apache, editing the .htaccess file lets you manage redirects at the server level. This is more efficient for handling large batches of redirects or wildcard patterns (e.g., redirecting entire folders) that aren’t practical through the Admin Panel.
Steps to Add Redirects in .htaccess:
1. Connect to your server via FTP, SFTP, or a hosting control panel.
2. Locate the .htaccess file in the root directory of your Magento installation.
3. Add redirect rules using Apache syntax:
# Permanent redirect (301) from old to new path
Redirect 301 /old-page.html /new-page.html
# Wildcard redirect example
RedirectMatch 301 ^/old-directory/(.*)$ /new-directory/$1
4. Save the file and clear Magento’s cache.
5. Test the redirects by visiting the old URLs.
Pros and Cons:
- Pros:
- Best for bulk redirects and pattern‑based rules.
- Executes at the server level and takes effect before Magento processes the request.
- Best for bulk redirects and pattern‑based rules.
- Cons:
- Requires access to server config and some knowledge of Apache rewrite syntax.
- Syntax errors can break your site if not tested carefully.
- Requires access to server config and some knowledge of Apache rewrite syntax.
Best Practice: Use .htaccess redirects for domain‑wide changes, directory moves, or pattern‑based rules that would be tedious to recreate individually in the Admin Panel.
Programmatically Creating Redirects (for Developers)
For stores with large catalogs, dynamic conditions, or automated workflows (like migrations or mass updates), you can create redirects programmatically in Magento 2 through a custom module or setup script. This offers the most flexibility and can be integrated directly into your deployment process.
How It Works:
Developers typically create a module that uses Magento’s UrlRewrite model to insert redirect entries into the system. Here’s a simplified PHP example demonstrating how to create a permanent redirect:
use Magento\UrlRewrite\Model\UrlRewriteFactory;
$rewriteFactory = $objectManager->create(UrlRewriteFactory::class);
$urlRewrite = $rewriteFactory->create();
$urlRewrite->setStoreId(1)
->setIsSystem(0)
->setIdPath(‘custom-redirect-1’)
->setRequestPath(‘old-url.html’)
->setTargetPath(‘new-url.html’)
->setRedirectType(301)
->save();
After writing and registering the module, run:
php bin/magento setup:upgrade
php bin/magento cache:flush
Test your redirects afterward to confirm they work as expected.
Why Programmatic Redirects Are Useful:
- Great for bulk operations (hundreds or thousands of redirects).
- Can automate redirects when migrating product catalogs or updating hundreds of URLs after a redesign.
- Enables dynamic logic based on conditions like store view, customer group, or locale.
Magento 2 gives you flexible ways to implement redirects, whether you need a single URL change or a large‑scale migration strategy. For most store owners, the Admin Panel’s URL Rewrites tool will handle common cases easily. When you need server‑level control, use .htaccess, and if you’re managing a high volume of changes or complex logic, programmatic redirects will save time and ensure consistency.
How to Create Redirects in Magento 2 With BSS Commerce SEO Extension
Using dedicated Magento 2 Redirect Extensions like the Magento 2 SEO Extension by BSS Commerce makes redirect management easier and more powerful than the default tools — especially for larger catalogs or frequent URL changes. This extension includes a Redirect 301 SEO feature that lets you create and manage redirects directly from the admin, helping preserve SEO value when URLs change.
Steps to Create Redirects With the Extension:
1. Install and Configure the SEO Extension:
- Purchase and install the Magento 2 SEO Extension from BSS Commerce (or the Adobe Marketplace).
- Follow the installation instructions to upload and enable the module in your Magento instance.
- After installation, go to Stores → Configuration → BSSCOMMERCE to access the SEO settings.
2. Open Redirect Management Panel:
- In the Magento admin sidebar, look for the SEO menu added by the extension (often under SEO or BSSCOMMERCE SEO).
- Navigate to the Redirects section where you can add or manage URL redirects.
3. Add a New Redirect:
- Click Add New Redirect (or similar).
- Enter the Request Path (the URL you want to redirect from) and the Redirect URL (the destination).
- Choose 301 (permanent) or 302 (temporary) based on your needs.
- Save the redirect rule.
3. Manage Existing Redirects:
- The extension provides a list of all created redirects within the same interface.
- You can search, filter, edit, or delete redirect entries as needed.
- Some versions also include bulk import/export, redirect logging, or automatic creation for 404 pages.
4. Test Redirects:
-
- After saving, test each redirect by visiting the old URL to confirm it correctly forwards to the new destination.
- Regularly check redirects to make sure they aren’t causing loops or chains.
- After saving, test each redirect by visiting the old URL to confirm it correctly forwards to the new destination.
Why Use the BSS SEO Extension for Redirects:
- Centralized redirect management with search and filter support
- Easier bulk redirect workflows compared to native Magento URL Rewrites
- Additional SEO tools (canonical tags, sitemap enhancements, rich snippets) that improve your broader SEO strategy while handling redirects
👉 You can view the full official user guide for the BSS Commerce Magento 2 SEO Extension here: BSS Commerce SEO Extension User Guide
Best Practices for Magento Redirects
Setting up redirects in Magento 2 is not just about making old URLs point to new ones—it’s also about maintaining SEO value, avoiding technical issues, and improving user experience. Following best practices ensures your redirects are effective and don’t create problems for your store.
Use 301 Redirects for Permanent Changes
A 301 redirect indicates that a page has permanently moved to a new URL. This type of redirect passes most of the original page’s SEO value (link equity) to the new page.
When to use:
- Renaming product or category URLs
- Migrating pages after a redesign
- Consolidating content to avoid duplicates
Tip: Avoid using 302 redirects for permanent changes, as this can cause search engines to continue indexing the old URL and dilute SEO authority.

Use 302 or 307 Redirects for Temporary Pages
Temporary redirects, such as 302 or 307, signal that the move is not permanent.
When to use:
- Seasonal promotions or flash sales
- A/B testing new landing pages
- Temporary maintenance or content swaps
Tip: Ensure you switch temporary redirects back to 301 if the change becomes permanent.
Avoid Redirect Chains and Loops
Redirect chains occur when URL A redirects to URL B, which then redirects to URL C. Redirect loops happen when a URL redirects back to itself. Both can:
- Slow down page loading
- Confuse search engines
- Reduce link equity
Best practice:
- Always redirect directly from the old URL to the final destination
- Periodically audit your redirects to catch chains or loops
Monitor 404 Errors and Broken Links
Broken internal links often appear after URL changes, product removals, or category restructuring and can quietly undermine both SEO performance and user experience. Regularly auditing your Magento store for broken internal links helps identify hidden 404s, prevent wasted crawl budget, and ensure visitors always reach valid, relevant pages instead of dead ends.
How to monitor:
- Use Google Search Console to track 404 errors
- Implement a reporting tool or extension to log broken links
- Redirect 404 URLs to the most relevant page
Tip: Don’t redirect all 404s to the homepage, as this can confuse users and dilute SEO.
Keep Redirects Organized
For larger stores, managing hundreds or thousands of redirects can become overwhelming.
Best practices:
- Maintain a spreadsheet or database of all redirects
- Include the request path, target path, redirect type, and date implemented
- Periodically review and remove unnecessary redirects
Test Redirects Before Going Live
Always test redirects before finalizing them to ensure they work as expected:
- Open the old URL in a browser and confirm it redirects correctly
- Use online redirect checkers to verify the HTTP status code
- Ensure that the target page is accessible and relevant
Use Extensions for Bulk Management (Optional)
If your store has a large number of URLs or frequent changes, consider using a Magento redirect management extension. Benefits include:
- Bulk import and export of redirects
- Monitoring and reporting of broken links
- Easy integration with SEO workflows
Following these best practices ensures that your Magento 2 redirects maintain SEO value, improve user experience, and prevent technical issues like redirect loops or broken links. Proper planning, testing, and monitoring are key to a smooth redirect strategy.
Common Magento Redirect Issues and How to Fix Them
Even after setting up redirects correctly in Magento 2, you may encounter issues that prevent them from working as expected or negatively affect your SEO. Understanding these common problems and knowing how to resolve them is crucial for maintaining a healthy store and preserving search engine rankings.
Redirect Not Working After Setup
Sometimes, a redirect set up via the Admin Panel or programmatically may not function correctly. Common causes include:
- Incorrect request or target path: Make sure you use the correct relative URL (without the domain) in the Request Path and Target Path fields.
- Wrong redirect type: Ensure you are using 301 for permanent redirects and 302 for temporary ones. Using the wrong type can confuse browsers and search engines.
- Conflicting URL rewrites: Another URL rewrite rule may be overriding your redirect. Check for existing entries in Marketing → SEO & Search → URL Rewrites.
Fix:
- Double-check the paths and redirect type.
- Remove or adjust any conflicting rules.
- Clear the Magento cache (System → Cache Management → Flush Cache) and test again.
Duplicate URLs and SEO Conflicts
Magento stores sometimes generate multiple URLs for the same page, causing duplicate content issues and SEO conflicts. Redirects may not resolve these problems if multiple versions of a URL exist.
Common scenarios:
- Products are accessible via multiple categories.
- URLs with and without trailing slashes.
- Duplicate URLs from old versions of your store.
Fix:
- Identify duplicate URLs using tools like Google Search Console or an SEO crawler.
- Consolidate duplicates by setting up 301 redirects from the duplicate URLs to the preferred URL.
- Enable canonical tags for products and categories to indicate the main URL to search engines.
Tip: Always redirect old URLs before deleting or disabling them to prevent broken links.
Caching Issues Affecting Redirects
Magento 2 heavily relies on caching for performance, but cached pages or server-level caches (like Varnish or CDN caches) can prevent new redirects from taking effect immediately.
Symptoms:
- The redirect works in an incognito window but not in a regular browser session.
- Changes in the Admin Panel don’t appear immediately on the live site.
Fix:
- Clear Magento cache: System → Cache Management → Flush Cache.
- Clear Varnish or CDN cache if your store uses them.
- Test the redirect in a private browsing session to bypass local browser cache.
Tip: Schedule regular cache flushes after bulk redirect updates to ensure all users experience the correct page routing.
Summary: Common redirect issues in Magento 2 are usually caused by configuration errors, duplicate URLs, or caching problems. By carefully checking paths, managing duplicates, and clearing caches, you can ensure your redirects work reliably, preserve SEO value, and provide a seamless user experience.
Conclusion
Managing redirects in Magento 2 is essential for maintaining a seamless user experience and preserving your store’s SEO value. Whether you use the Admin Panel, edit the .htaccess file, or create redirects programmatically, the key is to implement them carefully, test them thoroughly, and monitor their performance regularly. By doing so, you can prevent broken links, avoid SEO issues, and ensure that visitors always reach the right pages on your store.